All posts by Steve

Print Photoshop Color Separations With Illustrator

How To Print Photoshop Multi-Channel Color Separations With Adobe Illustrator

This video covers using Adobe Illustrator to print halftone channel separations done within Adobe Photoshop.  It should be very helpful, especially for newer users just starting out. The video assumes a RIP is being used with your inkjet printer. If a RIP is not available, see our video on printing film positives directly from Photoshop without a RIP.

Windows License Updater

Download The UltraSeps Windows License Updater (If Needed)

If your copy of UltraSeps for Windows was downloaded prior to 2/2/2016, we highly advise downloading and running this small update installer. The updater makes changes to the licensing to permit system upgrades or downgrades without having to reauthorize UltraSeps again. Therefore, if upgrading to Windows 10 from Windows 7 for example, UltraSeps will continue to function without a new unlock code.

ultraseps windows 10Download Here

Its possible that Windows or your antivirus software may trigger a warning prior to running the installer due to the file being new, not whitelisted or trusted by new security features within Windows 10. Please ignore these warnings if generated and install the update. This installer merely replaces the drivers our licensing uses with new versions.

Manually Install UltraSeps Plugin CC 2017-2018

How To Manually Install The UltraSeps Plugin
And English.data File – Photoshop CC 2017 – 2018 And Later

If installing a new version of Photoshop such as CC 2017, 2018 or later to your system after UltraSeps has been installed and unlocked previously, the UltraSeps Plugin and English.data file will also need to be copied to the new copy of Photoshop in addition to the UltraSeps v2 Actions loaded into the Actions Panel of the new Photoshop. Just installing the Actions and loading the Color Settings does not make UltraSeps functional with the new copy of Photoshop.

The below process can also done by running a newly downloaded installer, although if your copy of Photoshop is installed to a location other than Program Files on Windows or the Applications Folder on Macintosh, these files will need to be placed manually as per below instructions.

Manual Plugin Install Instructions for Photoshop CC 2018 or later:

Close Photoshop.

Locate the Adobe Photoshop CC 2018 folder currently in use and open it.

The Photoshop CC 2018 folder can be found in Program Files/Adobe on Windows systems
or in the Applications Folder on Macintosh.

Now go to the UltraSeps v2 Folder downloaded from our site, the one containing all the files.

Open the Backup Files Folder.

Copy the English.data file to the Photoshop Folder. This is not required on Macintosh.

Now open the Plug-ins Folder inside the Photoshop folder.

Copy the correct UltraSeps Plugin to the Plug-ins Folder for the new Photoshop and system.

Restart Photoshop if running.

Load the UltraSeps v2 Actions into the Actions Panel of Photoshop.

Run the Action to load the UltraSeps Color Settings.

All will now function.

Reset Photoshop Preferences

How to reset the Preferences of Photoshop to resolve Runtime 216 errors, blank channels
or solid damaged channels within a color separation.

If getting solid or blank channels when running Index or any other type of color separation, this usually indicates the Invert function of Color Range needs to be reset. One way to resolve the issue is to just restart Photoshop. Another way is to make a new channel using Color Range and to make sure to uncheck Invert.

If still experiencing issues, Photoshop’s Preferences File needs to be reset.


Hold down the three modifier keys Ctrl-Alt-Shift if using Windows
or (Command-Option-Shift with Mac) while starting up Photoshop.

On Windows, these keys might need to be held down immediately AFTER double-clicking Photoshop to launch it.

On Mac, they can be held down while selecting Photoshop to launch.

Photoshop will display the following prompt:
reset photoshop preferences quikseps

Click “Yes” and Photoshop will delete the preference file.
This brings all settings back to factory default.
Make sure the three keys are already depressed while Photoshop starts.
Hold the keys down long enough during the startup process until you see the prompt.

Finally, make certain Photoshop has retained the UltraSeps Custom Color settings. If not, reload it.


Additionally, here is the file path to your Photoshop Preferences file if needing to delete it manually.
The paths below reference Photoshop CS6, so just substitute your version for CS6.

Please note, the AppData Folder on Windows is usually hidden by default. So you’ll need to turn on the system option to view invisible files and folders. If unsure how to show hidden files and folders in Windows, just do a search for that as there’s ample information available.

Windows
Under Windows XP the preference file will be found at:
C:\Documents and Settings\[username]\Application Data\Adobe\PhotoshopCS6\Adobe Photoshop CS6 Settings\Adobe Photoshop CS6 Prefs.psp

Windows Vista, Windows 7, 8 and 10, the preference file will be found at:
C:\Users\[Username]\AppData\Roaming\Adobe\Adobe Photoshop CS6\Adobe Photoshop CS6 Settings\Adobe Photoshop CS6 Prefs.psp

Macintosh
On Macintosh the preference file can be found at:
/Users/[Username]/Library/Preferences/Adobe Photoshop CS6 Settings/Adobe Photoshop CS6 Prefs.psp

Note: Starting with MacOS 10.7 and later, Apple has hidden the Library folder, so you may need to make it visible. Although hidden, the location is the same for all Mac OS versions. To view the Library Folder, hold down the Option Key and select Go from the Menu Bar. Library can now be selected from the Go Menu.

Photoshop CC 2015 Errors Video UltraSeps

Photoshop CC 2015 Bugs – Examples – How To Fix

This video covers a few bugs within Photoshop CC 2015. Covers the damaged white underbase and highlight channel issue (if this is a problem on your system) and also the Command Move Error when running separations. We’ll generate the errors and provide simple solutions to resolve. These errors pertain to running color separations and possibly other automated processes using Photoshop CC 2015 and is vital information,
especially for those doing t-shirt color separations.

NOTE: Adobe has addressed these issues beginning with CC 2015.5, 2017, 2018, etc. so the errors are no longer generated.

Photoshop CC 2015 – White Base – Highlight Channel Fix

Photoshop CC 2015 Update – White Base & Highlight Issue & Fix

Example of separation where the highlight white is damaged and is covering just about everything.
photoshop cc 2015 channel separations

The separation above was run using a freshly updated and installed copy of Photoshop CC 2015 affected by the bug.

When running separations with UltraSeps using Photoshop CC 2015 and possibly future versions yet to be released, some of the white underbase and highlight white channels may not render correctly.

This is a bug with CC 2015 and may also be an issue with versions going forward although we have yet to see this with versions 2017 and 2018.  So likely the issue will no longer appear.

I’ve traced this bug to an issue with the manner in which Photoshop CC 2015 generates its Preferences File. It seems as though the Preferences has a glitch whereas certain functions of JavaScript’s do not run correctly and causes some sort of confusion with the foreground and background colors.

Running our Repair CC 2015 Action resolves this abnormality and after doing so, all separations will render correctly. Its important to note that if ever resetting the Preferences due to some other issue, this Action will need to be run again.

Download The CC 2015 Repair Action Here

Therefore, if separations don’t appear correctly with odd looking underbase whites and dark highlight whites with ink where none should be, simply run the Repair CC 2015 Action to fix.

The Action will prompt you to open the Space Shuttle sample file included with the Action.
Its also included with UltraSeps.

To use, simply load the Action into the Actions Panel of Photoshop and run.

A video is also available here which not only discusses how to use the repair action, but also provides an example of the issue itself before and after the simple fix.

Create Halftones In Photoshop For Screen Printing

photoshop halftones screen printing

A question I’m often asked, primarily by those either new to screen printing or just new to color separation is:

“How to do halftone color separations in Photoshop”.

Well, this question doesn’t have an absolute answer as there’s many ways to address it. First off, one doesn’t begin by generating a halftone separation. With the exception of Index Separations, which I’ll cover in another article, all color separations within Photoshop are actually grayscale channels that contain no halftone information whatsoever.

Once the separation is complete, usually within Channels (not Layers), at this point we begin to look at different methods to reach our final destination of halftones to film. And here is where all the confusion begins and potential issues stem

Basically, three methods exist to generate halftones from a completed color separation.

The first is to create individual bitmap documents with the proper halftone information embedded from each channel within the color separation. This is accomplished by “splitting the channels” of the color separation into individual grayscale documents.

Once split, each document is then converted to bitmap mode. Within the bitmap window upon conversion, the user would enter the required output LPI followed by the desired dot shape and angle. The dot shape can be elliptical or round and an angle that works and doesn’t create moire, such as 26 degrees.

Each document would then be sent to your printer directly from Photoshop. No other film output settings are needed other than the correct page size. Low cost color separation such as QuikSeps provides an automated process to complete this procedure.

The second is to create bitmap halftone channels within the existing grayscale color channel palette. This method is complex and usually requires the use of advanced color separation software such as UltraSeps. The process retains the separation within the channels panel with the designated color applied to each channel.

The benefits of a more advanced technique are twofold. One obvious advantage is the ability to preview the color separation itself as halftones and output to film directly within Photoshop.

Less obvious is the simplicity of film output as each color channel of the separation will print sequentially and automatically as opposed to printing multiple documents
An in-depth instructional video can be found here.

The final method is using a RIP such as AccuRip, FilmMaker, etc. “RIP”, is an acronym for Raster Image Processor. These RIP’s are not to be confused with “Color RIP’s”, which may be included with your inkjet printer or available elsewhere to control color output. The RIP software referenced are strictly for black ink halftone and solid film output.

These programs use sophisticated mathematical algorithms to generate high resolution and extremely clear and accurate halftones from a Photoshop channel separation or vector documents created with Illustrator, CorelDraw or other PostScript application.

Unlike halftones within Photoshop through the use of bitmaps, the quality of the dot is far superior when using a RIP. RIP’s also provide the added benefit of achieving a higher ink density to film. This is primarily accomplished by using multiple heads in the printer to image black ink and is a process unique to RIP software engineered for the printing industry.

The downside is the cost for a standalone RIP is $500 (or higher). This expense can be justified if high quality and easy film output is needed on a consistent basis to run your business. Although if only doing an occasional job, or if printing is strictly a part-time gig, buying a dedicated RIP can probably be avoided.

So what’s the right solution for you? Well, that depends on your business and budget. If deciding not to use a RIP and generate the halftones as bitmaps within Photoshop, you’re not alone. Countless printers use this free method and have been doing so for many years with great results. On the flip side, printers which I’ll classify as full-time commercial shops normally use an actual RIP for film output. While a small portion spend tens of thousands on direct imaging systems to eliminate the need for film altogether!

If you ask me, if just starting out or working on a small scale, forego the RIP as the $$$ can be of more use elsewhere. And when the day arrives where business is growing and transforms into a full-time occupation, then by all means invest in good RIP software.

One bit of advice is to avoid anything claiming to be a RIP but only works from a specific program. We know of one such product that ONLY works within CorelDraw. This fact alone is a major red flag as all actual RIP software will be functional and accessible from any PostScript or Raster program with film output integration. If the RIP doesn’t work with everything, its not a RIP and is merely generating bitmaps that can be accomplished without it.

Also stay away from free software RIP solutions such as Ghost Script. Although free, its problematic, cumbersome and very confusing. The functionality of Ghost Script isn’t mainstream and the program doesn’t integrate directly with applications such as Illustrator, Photoshop, CorelDraw, etc. It also lacks just about every wanted and needed feature of modern RIP software and doesn’t offer a multiple black ink head option or ink control of any sort.

Photoshop Color Separation Plugin

photoshop plugin color separation
There’s many ways to color separate artwork within Photoshop for t-shirt screen printing. How to obtain the best results for your shop.

Methods range from crude novice methods such as selecting elements within an image and creating Photoshop Layers from those selections, which is likely the worst method to use.

The slightly more advanced user might be doing color separations with selections made using the Color Range function of Photoshop and think they’ve discovered the secret. Well, this couldn’t be further from the truth.

Fact is, the use of Color Range along with the Fuzziness Slider has very limited color separation capabilities. It’s “okay” for selecting that odd color in a pinch, although pulling accurate color channels is just about impossible. Additionally, generating accurate blacks, white underbases, highlight whites, grays, flesh tones, precise light blue and medium blues, teals and many other colors is impossible!

To obtain accurate color separations of many types such as simulated process, true process, gray tone, duotone, etc. with clean, clear tonal qualities usually requires sophisticated plugins such as UltraSeps. Plugins such as these, which can also incorporate the use of Adobe JavaScript generate high-end Photoshop Channel separations that might not be possible without them.

Even highly experienced t-shirt artists and color separators at the largest screen printers worldwide make use of plugins such as these. And this includes talented artists with the ability to generate usable separations without them as the time savings alone are immense.

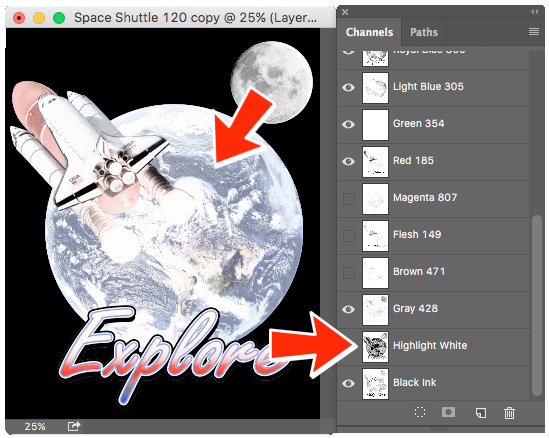
Channel separations do a fantastic job of converting full color images to a smaller selection of printable colors. The process allows those colors to blend on press to create the variations and shades found within the image without printing each one of them as a separate color.

The most popular form of channel separations in Photoshop is what’s known as Simulated Process Color. Although quality plugins offer many types of color separations, simulated process is by far the most often used.

If not using color separation tools such as UltraSeps, it can take what might seem forever to become proficient with channel separations such as simulated process. In fact, some screen printers eventually give up on trying to do complex separations and resort to rejecting work such as this. While others might look to contract the work out to another artist and printer which isn’t always the best alternative.

An initial big mistake many printers make is not embracing Photoshop to begin with and attempt to use a sub-standard product such as Gimp, which is free. And everyone really likes free….right? While others venture into a cheap third-rate software such as Affinity Photo.

Well, there’s a reason software such as this is either free or cheap, and the reason is they’re not adequate if generating high quality art and color separations is important to you. After all, this is YOUR BUSINESS and the method in which income is generated to sustain your lifestyle and needs.

The mistake of not embracing Photoshop is also twofold as color separation software, such as UltraSeps do not function within them. Even competing software products for the t-shirt printing industry don’t run within these free or cheap alternatives. So, what’s the point in using them?

Ask yourself: “Do I want to build a house using a hammer or a nail gun?” That’s pretty much what it boils down to. So if serious about running a profitable business, retaining your customers and attracting new business, its time for Adobe Photoshop along with excellent color separation software!

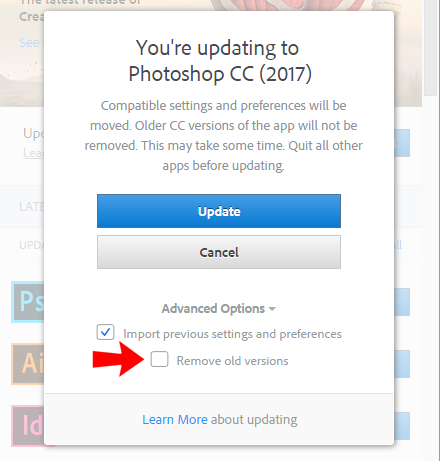
Regarding Photoshop, it’s not a requirement to use the latest version. The features found within the most recent release of Creative Cloud, when compared to an old copy such as CS4 has little to no benefit when creating artwork for t-shirt printing along with the color separation process itself.

So, if an older copy of Photoshop is available, subscribing to Creative Cloud isn’t required. Although by no means use any version of Photoshop prior to CS3 as that’s as far back as you’d want to venture as any version prior to that will be problematic.

As a rule of thumb, CS4 is a good choice with older Photoshop versions on Windows. On a Macintosh it gets a little more difficult as Macs are nowhere near as friendly with outdated software. So if a Mac, look for a copy of Photoshop CS6 if wanting to avoid subscribing to Creative Cloud. CS5 and CS 5.5 will run although a system patch needs to be downloaded to provide compatibility and these types of band-aids can sometimes slow down your system.

One point of interest is Adobe offers Photoshop and Lightroom at about $10 per month. Photoshop was a $700 stand-alone program when available for purchase, so $10 monthlu is a good deal, especially when considering upgrades are included within the price. Lightroom isn’t needed although it’s part of the deal, and if you’re into photography, it’s a great piece of software.

So there you have it! If looking to create eye-popping artwork for t-shirts and to effectively color separate the art for printing, two absolute requirements need to be addressed. First, get yourself a copy of Photoshop and do your best to learn the most important aspects of the program. Secondly, consider using a great color separation plugin!

Deleting Fringe Pixels From White Underbase

Removing fringe pixels from the edge of a white underbase channel with simulated process color, CMYK color or other type of Photoshop t-shirt channel color separation.

One of the most troubling aspects when dealing with artwork that that uses an edge glow or just fades off into nothing is dealing with the underbase white channel.

Simulated process color or other types of separations done using Photoshop, with the exception of Index color separations all fall victim to this problem. There’s several ways to resolve it, and the easiest way to make the adjustment is through the use of a simple Curve of the white underbase channel to remove pixels within the 1% – 6% (or so) range.

Note….Index Color is not a good choice for art that falls off into the shirt.

The first task is to select the white underbase channel of the separation.

Next, load the Curves function of Photoshop by going to Image > Adjustments > Curves.

Make sure the Curves box is configured like the sample below by selecting the Pigment/Ink % option followed by moving the lower handle directly along the bottom to an Input level of 5. If needed, try settings a little higher or lower to achieve the desired result.

Note….depending upon the Photoshop version in use, the Curves box may look different although the settings are still there.

This type of adjustment will only affect (remove) the lightest density pixels and should not damage the underbase, unless of course you went too far with the slider. So its a good idea to check the underbase following the adjustment to be sure enough white ink remains where needed.

Consider also dragging the upper right handle along the top and to the left to intensify the pixels which are more solid.

More often than not, this will provide enough removal to allow the underbase to print correctly on press.

Although I must be honest here….with some images this technique alone isn’t enough. Certain art that has a very soft and gradual fade into the shirt can be problematic. Therefore, using the eraser tool of Photoshop along with a feathered brush setting to manually delete the excess white from the faded edges of the underbase will most likely provide the results needed. I must stress that if using this manual technique, its extremely important to use a feathered edge brush and not a hard edge!

It’s also important to note that Photoshop has a tendency to overstate the effect of almost zero pixel density on your monitor. You’d never hold a 1% or 2% dot when exposing screens, especially a white underbase using a lower mesh count, yet Photoshop will greatly exaggerate their appearance.

photoshop curves adjust t-shirt artwork

Keep Previous Creative Cloud Versions During Upgrade

How To Keep Previous Photoshop Versions When Downloading
A New Copy From Creative Cloud

Note:  The method to keep previously installed versions of Photoshop CC when downloading the latest release may change when updates to the Creative Cloud application are released. Therefore, the info below could differ.  Although as of July 2021, the option remains to keep previous versions even if the screenshot pictured becomes outdated.

Most today are using Adobe’s Creative Cloud and there’s a few annoying facets of the service. One being habitual new versions that really don’t add much form and function to the program. The other is Adobe trying to remove previous Photoshop versions from your system when downloading their latest and greatest.

Removing the previous version of Photoshop is about the last thing you should permit as its always possible the newer version of Photoshop may not be compatible with third party software installed. Additionally, when installing a new Photoshop version from Creative Cloud, Adobe will move items such as Actions and Preferences from the older version, although does not automatically move plugins, filters, extensions, etc.

So to be safe, its recommended to keep the previous version. In fact, I recommend to never delete them.

The problem here is that Adobe doesn’t make it clearly apparent this is possible when deciding to download the new copy. Rest assured, its easy to accomplish as per the screen shot below.

Just click Advanced Options prior to initiating the download and UNCHECK Remove old versions. Doing so will install the latest Photoshop version and keep all your other copies from Creative Cloud intact. This will provide a safety net until the new install is up and running properly with all your third party software.

creative cloud for screen printing