All posts by Steve

Printing A Photo With White Ink On Black Tees

Accurate Method To Print A Photo Using White Ink Only On Black T-Shirts

We also have a video posted to the site which covers the process discussed below.

Although I’m usually asked complex questions on Photoshop and t-shirt color separations, I’m often asked what’s the best way to take a color or black & white photograph and print it to a black shirt using white ink only.

Most printers will take a color photograph, convert to grayscale or desaturate the image. Then proceed to invert the Layer and print that to film. The only problem with this technique is you’re not getting the full effect of how the image itself will print along with holding far too much grayscale information resulting in poor contrast.

The best method is the one described at the bottom of the page in the commented screenshot although we’ll discuss it here a bit further.

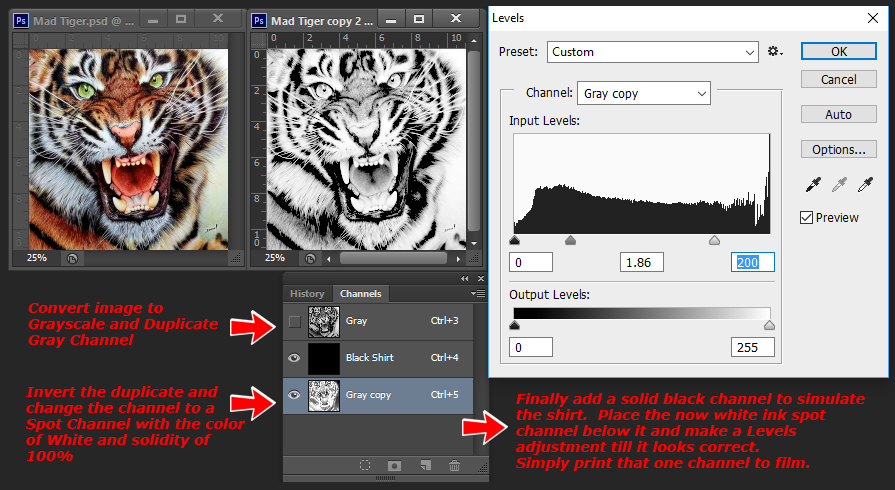
Simply take a single Layer grayscale image or an RGB or CMYK image and convert to grayscale.

Next in the Channels Panel duplicate the Gray Channel, Invert the new Channel, then convert the inverted duplicate channel to a Spot Channel using the color of White and a solidity setting of 100% as pictured below.

change spot color channel photoshop

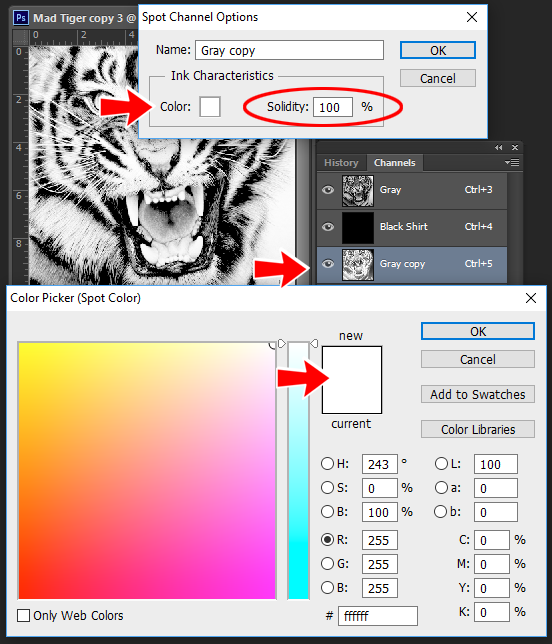
Next make a new spot channel using the color of Black at 100% Solidity (see below), fill the channel with 100% Black and move the channel containing the art below it. This black filled Channel is to simulate the shirt color. If printing on a color other than black, just create the new solid channel using a spot color something close to the shirt color being used and fill with 100% Black.

The channel containing the art will most likely need an adjustment using Levels or Curves to improve the contrast. I normally prefer using Levels to make this adjustment and use the center and far right handles and slide to the left as pictured in the example below.

Following the Levels adjustment, sharpening the channel slightly using the Unsharp Mask function of Photoshop will often improve the art further and add a bit of additional clarity.

The final check would be to define what needs to print absolutely 100% solid white. This is done by using the Curves function to intensify the darkest areas while not bumping up lighter areas.

Another method to intensify the density in the darkest areas to print brighter is while doing the Levels adjustment, move the left slider to the right slightly. This will darken the the art where the most ink is needed.

When making the Curves adjustment (if needed) have the Info Panel of Photoshop open and hover any tool above an area within the art that should be solid. The density reading within the Info Panel should be 100% or close to it. This is far more important with images that contain obvious solids as opposed to a purely photographic image.

Now simply output this single Channel to the printer using whatever settings you’re comfortable with. Another printing method is do a Select All > Copy of the White Ink Channel, create a new grayscale document and Paste into a Layer as opposed to printing the channel. Then just print the single Layer Grayscale document to your printer.

Following the the Select All and Copy, when choosing New Document, Photoshop will automatically be set to create a new document in Grayscale Mode at the exact size and resolution of the image copied to the clipboard. So all that’s needed is to paste into the new file.

print black t-shirt with white ink

Installing Older Versions Of Creative Cloud

Finding And Installing Previous Versions Of Adobe Applications
Using Creative Cloud

Sometimes it might be helpful or needed to download an older version of Adobe Photoshop or other Adobe application from Creative Cloud. The reasons could be for a compatibility issue with third party party products or for troubleshooting. Versions down to CS6 can be downloaded and installed.

Doing so does not remove other installed versions of Photoshop or any other Adobe application.

Launch Creative Cloud, click Apps on the top menu bar.
Next click the small downward facing arrow next to Open for the needed application.

Choose “Other Versions”.

photoshop for screen printing


using photoshop for t-shirt artwork

Windows 10 Should I Upgrade

windows 10 ultraseps

With the release of Windows 10, I know some are having doubts about upgrading. Well, before I get into any details, both UltraSeps and QuikSeps are 100% compatible with Windows 10. Although this doesn’t imply that you SHOULD upgrade. I have usually stuck with the OS a Windows computer was originally shipped with and this strategy has served me well over the years.

Since there’s no shortage of Windows 10 reviews, I’ll consolidate my views to the down and dirty only.

Not surprisingly, Windows 10 is a major improvement when compared to windows 8.1, although if using Windows 8.1 along with the free Classic Shell, which adds the Windows 7 style Start Menu to your system, I can see no compelling just-got-to-upgrade-now reason to wipe a Windows 8.1 system that is running well. Regardless of the glowing reviews most are awarding to Windows 10, lets face it, the primary change is the inclusion of the Start Menu.

If using solid and reliable Windows 7, most likely your computer has some years on it and wiping a perfectly good Win 7 box to install Windows 10 may not be in your best interests and just might border on the insane.

While its true the system can be reverted back to its original state, its more than worth noting that you only have a month to roll it back! About 30 days after upgrading, the Microsoft Fairy takes the old system away forever as Mister Softy desperately wants to rid the world of as many Windows installations as possible not named Windows 10. So be careful with this and make sure to have a full system backup if deciding to upgrade.

I’ve been using Windows 10 on a new, just purchased laptop which had 10 pre-installed. Overall, this new OS offers a somewhat improved desktop experience although feels a bit sluggish with basic tasks. Its clean, refined, and makes sense after getting acclimated to it.

My initial complaint is it refused to see the network hard disks and Macs on my network. After creating another user account, then logging in and out from both, the other non-Windows network devices decided to magically appear.

The next depressing encounter using Windows 10 are issues with delays loading streaming videos, video not buffering correctly, erratic and jumpy playback or video simply not loading period! I’ve experienced this annoyance myself, along with several associates I’ve discussed the matter with. This problem mostly occurs when using Wi-Fi, regardless of signal strength and I have confirmed this with several other Windows 10 users.

Microsoft seems to be aware of this problem and will probably address it shortly.

Edit 9/15/15….The video streaming issue seems to now be resolved.

Another annoying issue with Windows 10 is when using multiple monitors. Some upgrading to Windows 10 from a previous install of an earlier version of Windows have had problems getting multiple monitors recognized. Additionally, those using three monitors have had little to no luck getting the third functioning, including fresh Windows 10 installs to new systems. Here again, at some point I’m sure this will be resolved.

Conclusion? On a brand new system with at least 8GB of RAM, you’ll be a somewhat happy camper after a few days using it. The best plan of attack however would be waiting about six months for the bugs to get worked out if really wanting to upgrade.

If however your older system is running like a champ with many installed applications, plugins, dongles, proprietary software, etc., I would continue using it….as is. Why ask for a potential nightmare?

I’ll be retaining the services of Windows 7 for a long time on my primary business system.